Baza wiedzy
AVM Content
- FRITZ!Box 7690
- FRITZ!Box 7590 AX
- FRITZ!Box 7590
- FRITZ!Box 7583
- FRITZ!Box 7560
- FRITZ!Box 7530 AX
- FRITZ!Box 7530
- FRITZ!Box 7510
- FRITZ!Box 7490
- FRITZ!Box 6890 LTE
- FRITZ!Box 6860 5G
- FRITZ!Box 6850 5G
- FRITZ!Box 6850 LTE
- FRITZ!Box 6820 LTE
- FRITZ!Box 6660 Cable
Setting up an IPSec VPN to the FRITZ!Box in macOS
IPSec allows you to establish VPN connections to the FRITZ!Box on your computer with macOS. This way you can access your FRITZ!Box and all devices in your home network with your computer over a securely encrypted connection, even when you are away from home.
You can find an overview of additional VPN connection options in our guide VPN with FRITZ!.
Example values used in this guide
In this guide we show you how to connect a computer with macOS 11.0.1 to the FRITZ!Box over IPSec VPN. When setting up the connection, replace the values used in this guide with your actual values.
Requirements / Restrictions
- macOS 10.6 or later is installed on the computer.
- The FRITZ!Box must obtain either an IPv6 address or a public IPv4 address from the internet service provider.
1 Preparations
Setting up MyFRITZ!
Register the FRITZ!Box with MyFRITZ!Net so that it can always be reached on the internet at a fixed MyFRITZ! address:
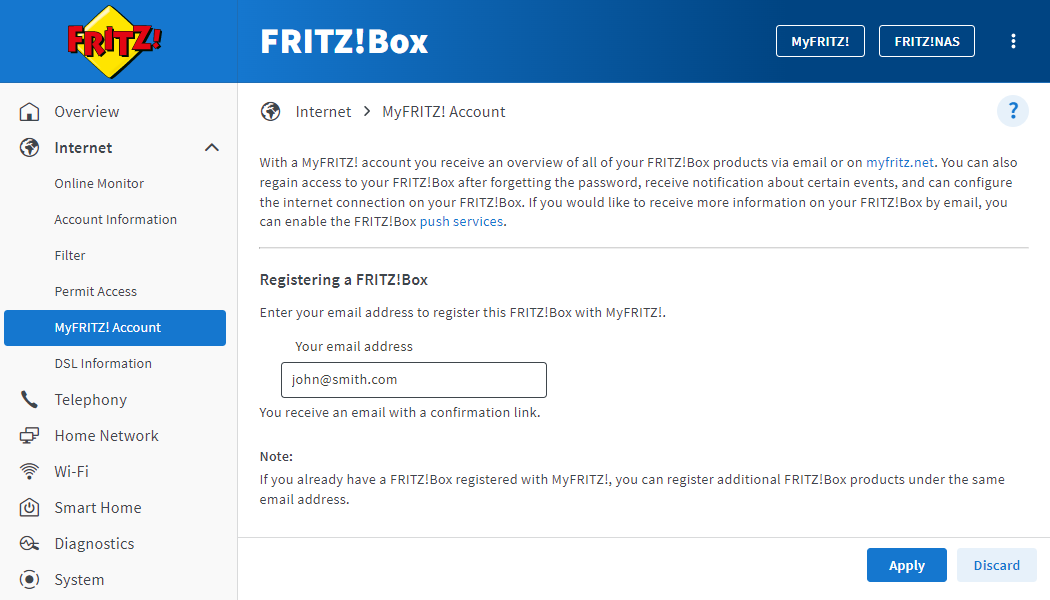
- Click on 'Internet' in the FRITZ!Box user interface.
- Click on 'MyFRITZ! Account' in the 'Internet' menu.
- Enter your email address in the 'Your email address' field.
- Click on 'Apply'. Now MyFRITZ!Net sends you an email with the confirmation link to your FRITZ!Box.
Important:If you do not receive an email, the email was classified as unsolicited advertising (spam). In this case, check the spam folder of your email inbox.
- Open the email you received from MyFRITZ!Net.
- Click on the 'Register Your FRITZ!Box' button in the email.
Adjusting the FRITZ!Box's IP network
Both ends of a VPN connection must have IP addresses in different IP networks. As soon as the computer is connected to a router (for example another FRITZ!Box) that uses the same IP network as your FRITZ!Box, VPN communication is no longer possible.
Note:All FRITZ!Boxes use the IP network 192.168.178.0 in the factory settings.
Set up an IP address in your FRITZ!Box that differs from the IP addresses of the routers you use to connect to the FRITZ!Box, for example 192.168.10.1 (subnet mask 255.255.255.0):
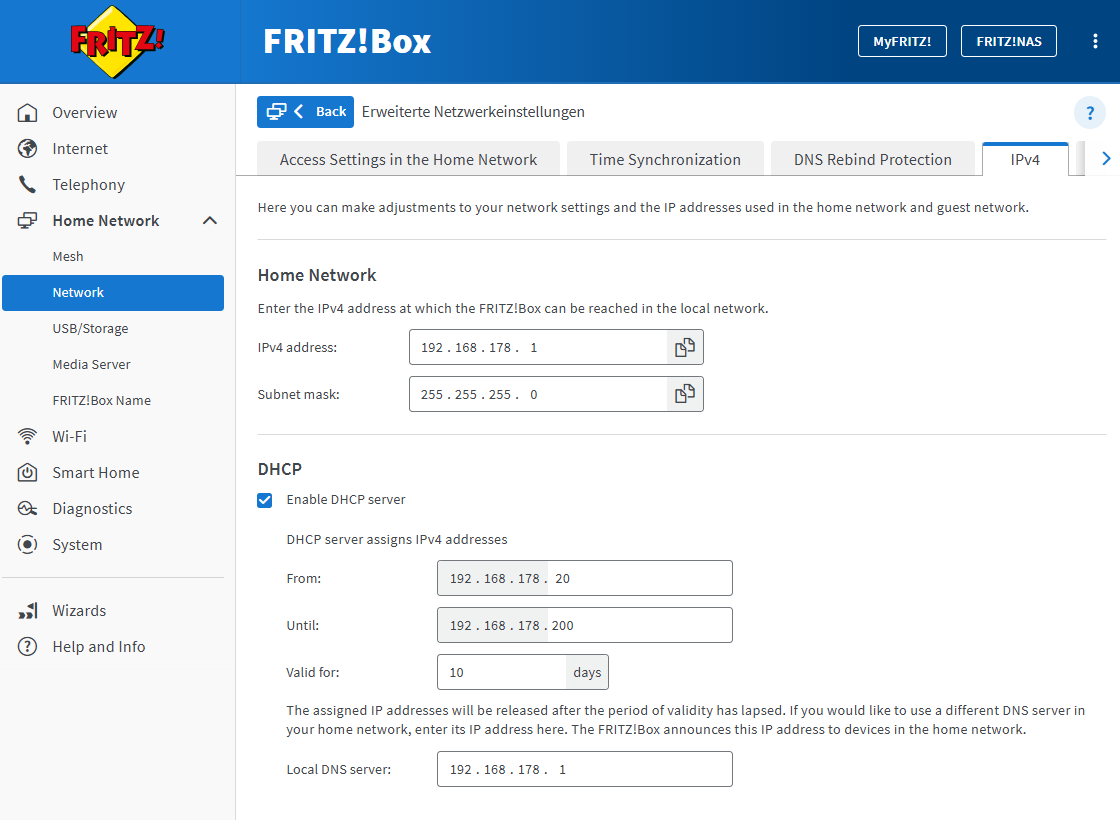
- Click on 'Home Network' in the FRITZ!Box user interface.
- Click on 'Network' in the 'Home Network' menu.
- Click on the 'Network Settings' tab.
- Click on 'Change Advanced Network Settings'.
- Click on the 'IPv4' tab.
- Enter the desired IPv4 address and subnet mask.
Important:Do not enter an IP address from the network 192.168.100.x. In compliance with DOCSIS, this network is reserved for the cable provider and may not be used in the FRITZ!Box.
- Click on 'Apply' to save the settings and on the FRITZ!Box, confirm that the procedure may be executed, if you are asked to do so.
2 Setting up a VPN connection in the FRITZ!Box
Set up a separate user for each VPN connection in the FRITZ!Box:
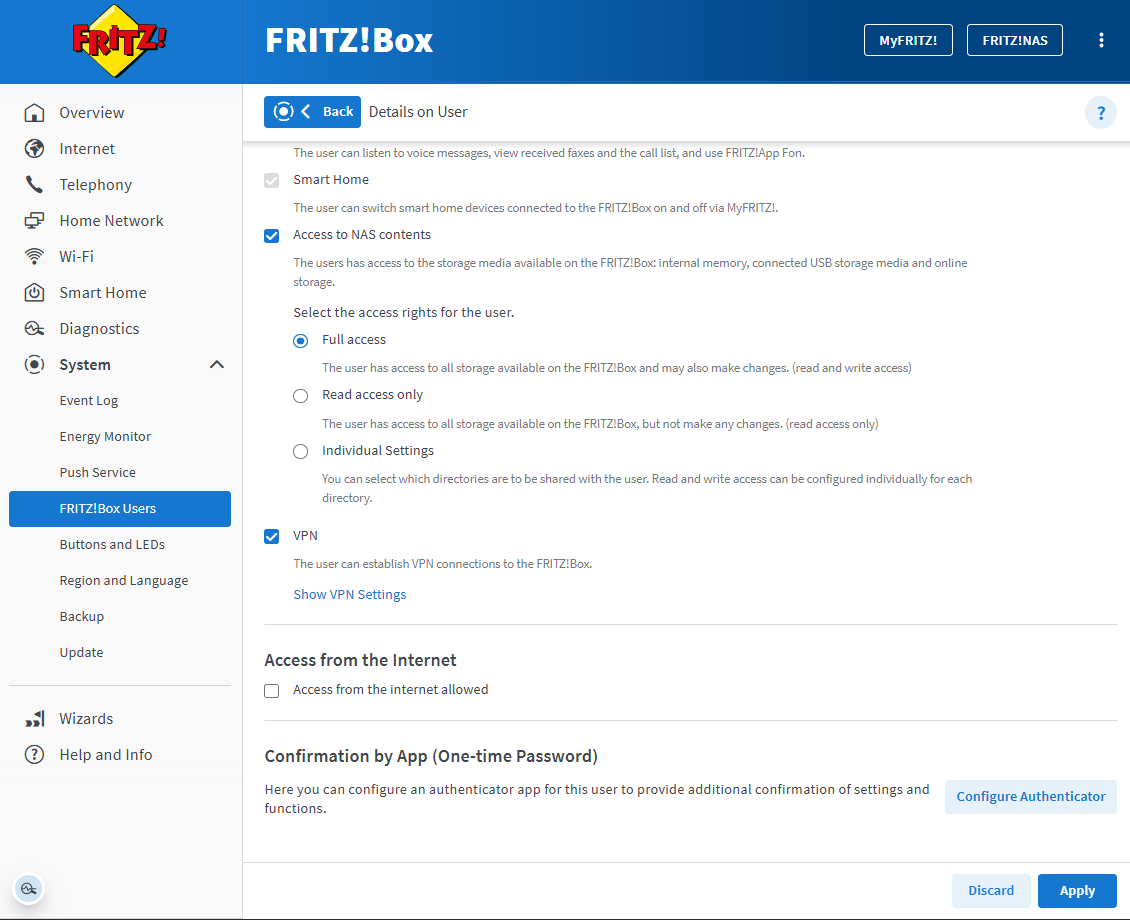
- Click on 'System' in the FRITZ!Box user interface.
- Click on 'FRITZ!Box Users' in the 'System' menu.
- Click on the
 (Edit) button for the user who intends to connect to the FRITZ!Box via VPN or set up a new user for the VPN connection:
- Click on the 'Add User' button.
- Enter a name and password for the user in the corresponding fields.
- Enable the option 'VPN'.
- Click on 'Apply' to save the settings and on the FRITZ!Box, confirm that the procedure may be executed, if you are asked to do so.
3 Opening the VPN settings
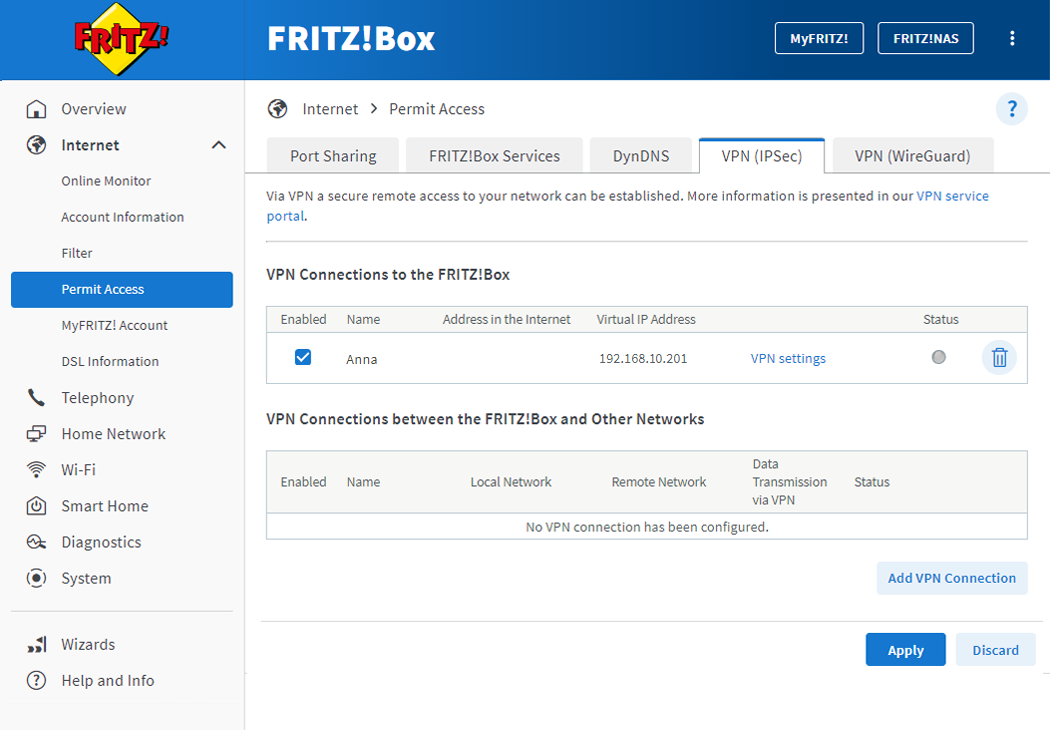
- Click on 'Internet' in the FRITZ!Box user interface.
- Click on 'Permit Access' in the 'Internet' menu.
- Click on the 'VPN (IPSec)' tab.
- Click on the 'VPN Settings' link for the user who intends to connect to the FRITZ!Box via VPN.
- If you are asked to do so, on the FRITZ!Box confirm that the procedure may be executed and click on 'OK' to complete the procedure.
4 Setting up and establishing a VPN connection on the computer
Set up the VPN connection on the computer using the VPN settings displayed in the FRITZ!Box user interface for the FRITZ!Box user:
- Open the 'System Preferences' in the Apple menu.
- Click on 'Network' in the 'System Preferences' menu.
- Click on the plus sign below the list with the existing connections.
- Select 'VPN' from the drop-down list 'Interface'.
- Select 'Cisco IPSec' from the drop-down list 'VPN Type'.
- Enter a name of your choice (FRITZ!Box VPN) for the 'Service Name' and then click on 'Create'.
- Enter the MyFRITZ! address of the FRITZ!Box (pi80ewgfi72d2os42.myfritz.net) for the 'Server Address'.
- For the 'Account Name', enter the name of the FRITZ!Box user (John Smith) who intends to connect to the FRITZ!Box via VPN.
- Enter the password for the FRITZ!Box user (secret1234) in the 'Password' field.
Important:If you enter the password, a password will not be required to establish the VPN connection. Protect your computer with a password so that unauthorized persons cannot use the VPN connection.
- Click on 'Authentication Settings ...'.
- In the 'Shared Secret' field, enter the shared secret (Zj7hPCouK65IrPU4) displayed in the VPN settings for the FRITZ!Box user.
- Enter the name of the FRITZ!Box user (John Smith) in the 'Group Name' field.
- Click on 'OK' and then 'Apply' to save the settings.
- Click on 'Connect'.