Baza wiedzy
AVM Content
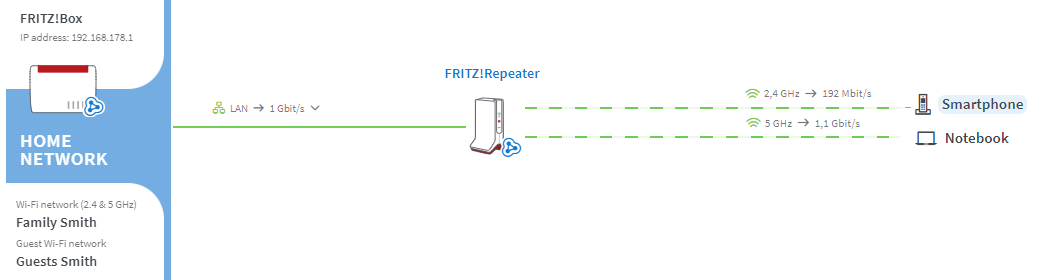
Integrating FRITZ!Repeater into the Mesh via LAN
Integrate your FRITZ!Repeater into the Mesh of your FRITZ!Box via LAN to increase the Wi-Fi range of your home network easily and efficiently. As a Mesh Repeater, the FRITZ!Repeater then automatically adopts all of the settings from the FRITZ!Box (Mesh Master), such as Wi-Fi access information and guest access. In the Mesh, your wireless devices automatically connect to the wireless access point with the best Wi-Fi reception.
Changes in the Mesh can then be easily made in the Mesh Master. The Mesh Master automatically transmits the new settings to all of the Mesh Repeaters. If you still want to access the user interface of the Mesh Repeater, use the password from the Mesh Master to log into the Mesh Repeater.
As soon as the FRITZ!Repeater is integrated into the Mesh, it is marked with the Mesh symbol  in the user interface of the Mesh Master:
Requirements / Restrictions
- The FRITZ!Repeater has a LAN port.
- FRITZ!OS 7 or later is installed on the FRITZ!Repeater.
Important:You can find instructions on setting up older FRITZ!Repeater models that do not support Mesh at en.avm.de/service under 'FRITZ!WLAN > Knowledge Base > [FRITZ!Repeater model] > Knowledge Base' if you search for 'connect repeater'.
Note:All instructions on configuration and settings given in this guide refer to the latest FRITZ!OS for the FRITZ!Box.
1 Loading the FRITZ!Repeater's factory settings
To perform the following steps, the FRITZ!Repeater must be set to factory settings:
- Load the FRITZ!Repeater's factory settings.
2 Connecting the FRITZ!Repeater with a FRITZ!Box via LAN
- Use a network cable to connect the FRITZ!Repeater to a LAN port on the FRITZ!Box.
3 Adding a FRITZ!Repeater to the Mesh by button
You must push a button to add the device to the Mesh. It does not matter whether you push the button on the Mesh Master or the Mesh Repeater first. We recommend the following order:
- Briefly push the Connect button or WPS button on the FRITZ!Repeater (for about 1 second) and release it again. When you release the button, the Connect LED starts to flash quickly or the WLAN LED starts to flash.
- Within 2 minutes: Push and hold down the Connect button on the Mesh Master until the Connect LED (see table) lights up or starts to flash. Other LEDs may also light up or flash.
FRITZ!Box model Connect button Connect LED FRITZ!Box 6690, 5690 Pro, 4060 Connect Connect FRITZ!Box 6860 Connect WLAN FRITZ!Box 7690, 7682, 7590 (AX), 7530 (AX), 7520, 7510, 6890, 6850, 6670, 6660, 5690, 5590, 5530, 4690, 4050 Connect / WPS Connect / WPS FRITZ!Box 6591, 6590 Connect / WPS WLAN / DECT FRITZ!Box 7490, 7430, 5491, 5490 WLAN WPS WLAN / Info FRITZ!Box 6490, 6430 WLAN WPS WLAN / DECT FRITZ!Box 7560, 7362 SL WLAN WLAN / DECT FRITZ!Box 7583, 7582, 7581, 7580 WPS WLAN / Info FRITZ!Box 6820, 4040, 4020, 3490 WPS WLAN - The process is complete as soon as the Mesh Master marks the FRITZ!Repeater with the Mesh symbol in the Mesh Overview.
Now the FRITZ!Repeater is configured as a LAN bridge and is available as an additional wireless access point.